

I remember promising some readers that I would post a tutorial about making Bag Tags. That was months ago. Well....I finally did it. Being a visual learner I probably took way too many pictures. For those of you who only require a few, hang in there! :)
The pattern was designed by my dear friend Mary Jane.
You will need:
- Timtex
-Fabric 3 1/2 x 12 inches
-Fabric Strip 14 inches by 1 7/8 (if you are using the binding machine otherwise use the width you prefer)
-Clear Plastic 2 1/2 x 4 1/4 inches - you can get this at Wal Mart (if they have fabric) or JoAnn's.
-MistyFuse
 Timtex cut 2 1/2 x 11 inches
 Fold Timtex in half
 Cut the tips off I used the Olfa Ruler
 Tips cut off
 Fabric 3 1/2 x 12 inches (Amy Butler Fabric)
 I use Best Press and iron my fabric. I like my fabric to be wrinkle free.
 Then I cut a piece of MistyFuse just larger than my Timtex (I eyeball the measurement). It might be difficult to see in this picture but if you look closely you can see it is about 1/4 inch larger all the way around.
 Then I lay my wrinkle free fabric down, put a layer of MistyFuse and then my Timtex.
 I trim the corners of the fabric off - freehand-does not need to be exact.
 I'm using "The Applique Pressing Sheet" because the MistyFuse does not stick to it. I flipped the fabric sandwich(fabric, MistyFuse, Timtex) over and pressed. I used "Hot Stuff Harriet" because she does not steam :) I love her....heavy and cheap ($3.00)
 Now I flip it over and press the sides in first. Next, I press down the ends. The extra MistyFuse is not visible here (it is wonderfully thin and leaves you fabric soft not stiff) but that is what holds the fabric in place. No need to use more or cut more it is already there.
 Then I press in the "ears"
 I fold it in half and press again.
 I feed it around the roller (I usually make 4 or more at the same time so I make lots of bias tape and I don't cut it on the bias because it is only being used for tag straps)
 Just lay the fabric over the roller.
 I cut it on an angle so it fits through the tip easier.
 I use my Awl aka "Pokey Tool" to get my fabric through evenly. You don't have to...I just do...
 As soon as it is fed through I remove the top of the Bias Tape Maker
 Top Removed....fabric comes across the plate and over the end roller.
The pattern was designed by my dear friend Mary Jane.
You will need:
- Timtex
-Fabric 3 1/2 x 12 inches
-Fabric Strip 14 inches by 1 7/8 (if you are using the binding machine otherwise use the width you prefer)
-Clear Plastic 2 1/2 x 4 1/4 inches - you can get this at Wal Mart (if they have fabric) or JoAnn's.
-MistyFuse
 Timtex cut 2 1/2 x 11 inches
 Fold Timtex in half
 Cut the tips off I used the Olfa Ruler
  Tips cut off
 Fabric 3 1/2 x 12 inches (Amy Butler Fabric)
 I use Best Press and iron my fabric. I like my fabric to be wrinkle free.
 Then I cut a piece of MistyFuse just larger than my Timtex (I eyeball the measurement). It might be difficult to see in this picture but if you look closely you can see it is about 1/4 inch larger all the way around.
 Then I lay my wrinkle free fabric down, put a layer of MistyFuse and then my Timtex.
 I trim the corners of the fabric off - freehand-does not need to be exact.
 I'm using "The Applique Pressing Sheet" because the MistyFuse does not stick to it. I flipped the fabric sandwich(fabric, MistyFuse, Timtex) over and pressed. I used "Hot Stuff Harriet" because she does not steam :) I love her....heavy and cheap ($3.00)
 Now I flip it over and press the sides in first. Next, I press down the ends. The extra MistyFuse is not visible here (it is wonderfully thin and leaves you fabric soft not stiff) but that is what holds the fabric in place. No need to use more or cut more it is already there.
 Then I press in the "ears"
 I fold it in half and press again.
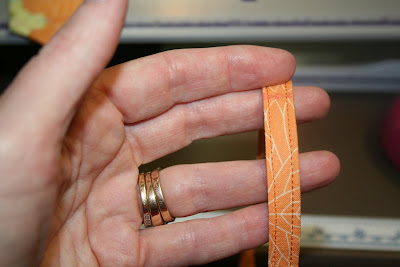
This is how I make my straps. You can use fabric to match, coordinate or clash :) You can also use ric rac or ribbon (anything your heart desires:)
I use my new Bias Tape Maker to make the straps. I cut my fabric 14 x 1 7/8 inches. You can do it the old fashion way and fold your fabric in half, then fold the edges in and press. You can use the Bias Tape tools by Clover too. What ever works for you. This is just how I do it.
 I feed it around the roller (I usually make 4 or more at the same time so I make lots of bias tape and I don't cut it on the bias because it is only being used for tag straps)
 Just lay the fabric over the roller.
 I cut it on an angle so it fits through the tip easier.
 I use my Awl aka "Pokey Tool" to get my fabric through evenly. You don't have to...I just do...
 As soon as it is fed through I remove the top of the Bias Tape Maker
 Top Removed....fabric comes across the plate and over the end roller.
 Note: you need to get the fabric over the end roller.
 Replace the top, turn it on-it heats up very quickly. (this picture was taken out of order. I take mine off first before feeding it but I also turn mine on and do it carefully. If you follow my lead....you can get burned....YIKES. Danger Will Robinson!!!!
 Waaaahhhhhh Laaaaaahhhhhh...you have bias tape :)
Subliminal message: Do not see the mess in the background.....do not see the mess in the background.....do not see the mess in the background.....
 I fold it in half and stitch down both sides.
 The stitches should be even....often my boys are playing next to me and I'm talking to them and not watching what I'm doing exactly. Then you get a wobbly line....I'm not thinking the bag handlers will notice....do you?
 I tuck my strap in half and edge the tips down into the Bag Tag about 1/2 inch.
The next few pictures relate to the cutting of the plastic. This is just how they got uploaded....You can cut your plastic at the same time you cut your fabric.
 Because I had such a hard time seeing the edge of my plastic when I cut it I use these Q Tools Cutting Edge Strips on the edge. You can see here that I place it on the edge of my roll of plastic.
 Now I can see where I'm cutting. This just makes it easier for my. You might not have a hard time seeing the plastic. I have these strips for my rulers and they are re-usable so I use them on my plastic too.
 First I stitch right along the edge of the strap securing it in place. I usually go forward and backward and forward again. This secures the strap into the Bag Tag.
 Just as I turn to come down the side I place my plastic on top of the Bag Tag. It is a little difficult to see here but that is what I've done. I use my walking foot because it glides over the plastic and does not get stuck. I've used my 1/4 inch foot and it sticks to the plastic.
 I continue stitching all the way around and then clip my threads. Then I put a business size card behind the plastic.
 Because I had such a hard time seeing the edge of my plastic when I cut it I use these Q Tools Cutting Edge Strips on the edge. You can see here that I place it on the edge of my roll of plastic.
 Now I can see where I'm cutting. This just makes it easier for my. You might not have a hard time seeing the plastic. I have these strips for my rulers and they are re-usable so I use them on my plastic too.
Back to the Bag Tag Sewing
 First I stitch right along the edge of the strap securing it in place. I usually go forward and backward and forward again. This secures the strap into the Bag Tag.
 Just as I turn to come down the side I place my plastic on top of the Bag Tag. It is a little difficult to see here but that is what I've done. I use my walking foot because it glides over the plastic and does not get stuck. I've used my 1/4 inch foot and it sticks to the plastic.
 I continue stitching all the way around and then clip my threads. Then I put a business size card behind the plastic.
You can make an assembly line to make several tags at once. They make really great gifts. Everyone I've ever given them to has told me how much they appreciate them. I put them on my boy's back packs for school, lunch boxes, gym bags and my luggage. I have made them in smaller sizes for gift tags and then they can use them for their bags afterwards.
This tutorial took quite a bit of time to do the pictures, upload them, write out the tutorial etc etc etc. I did not share the pattern (which took MJE time to create) without her permission. I ask that you not copy my instructions without my permission. The pattern and instructions are being shared freely and not intended for sale or profit.
If you get stuck or need more information feel free to e-mail me at IHaveANotion@yahoo.com. If you need any of the items used to make Bag Tags check out www.IHaveA-Notion.com
I would love to see your Bag Tags. If you make some please, please, please send me pix to share.
Smiles,
Kelly