
Thank you SewCalGal for including me in the "It's All About Kid's Blog Hop." This has been a lot of fun to hop around and read the wonderful posts. If you have not been out hopping, may I suggest you get your fingers clicking....there are lots of ideas and prizes too.
When I first became a Mom 15 years ago my favorite thing was showing my daughters how to make boxes using chipboard and art paper. Then we made beaded Christmas ornaments for gift giving and of course there was scrap booking and sewing back then too.
Fast forward a few years and we added two boys to the IHAN clan. Sewing these simple aprons helped keep food and art supplies off of the kids clothing.


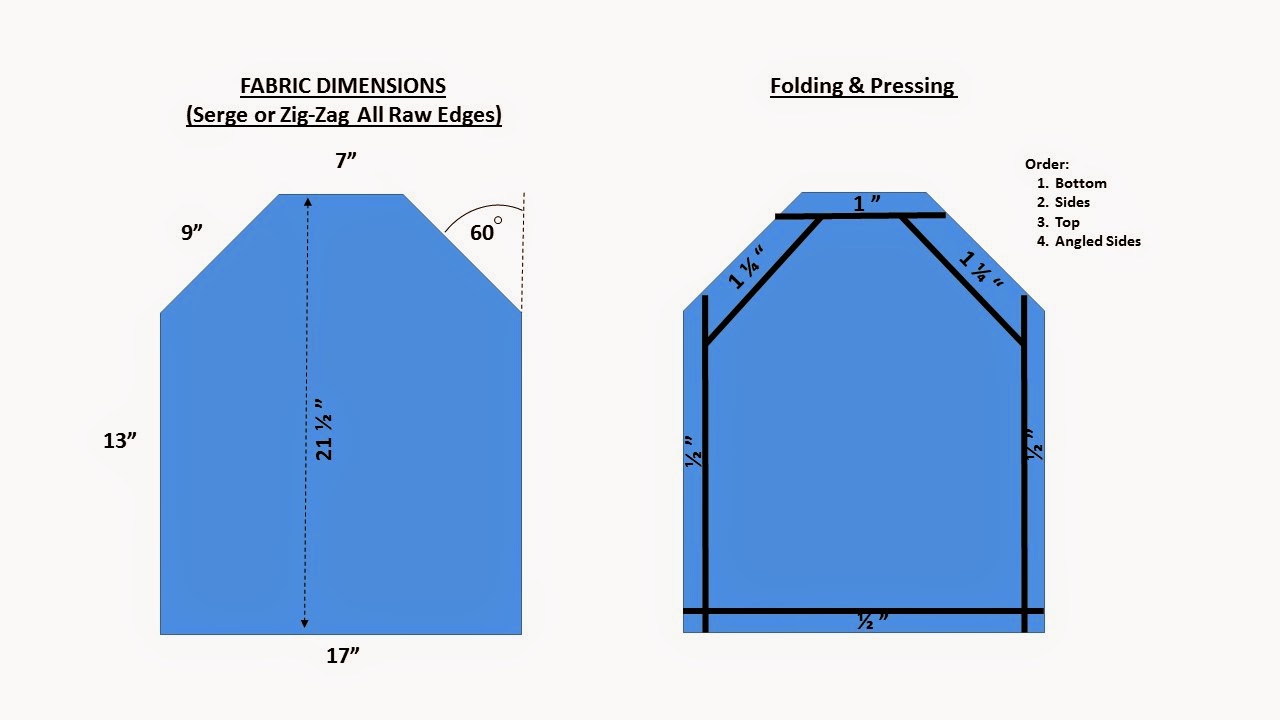

 After you have cut your fabric ,serge or zig zag the edges. If you prefer, you can cut your fabric 1/2 inch larger on all sides and fold over twice to give a finished edge instead of using a serger or using a zig zag stitch on the edge. Above you can see I have serged the edges of this very cute fabric.
 Next I turn the bottom edge up 1/4 inch pressing as I go. Do the same for the sides and then fold down the top 1" and press.
 Last is the angled arm/side and I turn that edge under 1 1/4" and press. This will create a casing that the cording will go through.
 I begin by sewing along the bottom followed by the sides. Since I've turned the fabric under a 1/4" I just stitch along the edge using my 1/4" foot as shown above.
When I finish the sides and the neck, I take the cording and lay it under the fabric casing I have made.

 This step keeps me from having to thread the cording through the casing when I'm finished. I tie a knot at the end of my cording because I use macrame cording and it will fray.
 Since this is for a gift, I embroidered the child's name on the apron. You can use denim, duck cloth, or any other fabric of your choosing and embellish as desired. Pockets are fun for supplies and provide a great hiding place for sticky treasures.
Here are some other aprons I have cut out and have ready to go when I need a quick gift.


 a Rafflecopter giveaway
We appreciate your stopping by, please continue to visit those bloggers who are participating in the hop. The links to their posts are below.

When I first became a Mom 15 years ago my favorite thing was showing my daughters how to make boxes using chipboard and art paper. Then we made beaded Christmas ornaments for gift giving and of course there was scrap booking and sewing back then too.
Fast forward a few years and we added two boys to the IHAN clan. Sewing these simple aprons helped keep food and art supplies off of the kids clothing.
Aaron was 3 years old in this photo and he is wearing an apron I made by laminating cotton fabric. The iron on vinyl comes in a Glossy and Matte finish. The laminated aprons were perfect because I could just wipe them off. We used them as "big boy bibs" when the boys thought they were too big for regular bibs.
Zach at 18 months old standing on a chair in the kitchen helping Mommy make some cookies. Where does the time go?
These aprons were made for my "Gentleman Diners." The boys always got the sweetest comments when we went out for dinner and I would put on their "big boy bibs."
These simple little aprons are so easy to make, your kids can even make them for themselves and as gifts. The best part is they last for years because they are adjustable. My boys wore their aprons for art until they were in 2nd grade.
I've taken photos for a tutorial and Mr. McSteamy created a PDF illustrating the process. If you have any questions at all, please feel free to send me an e-mail at IHaveANotion@yahoo.com and I'd be happy to explain anything that is not clear for you.
Supplies list:
1/2 yard of fabric
27-30 inches of macrame cording (or a cording / rope of your choosing)
Start by cutting your fabric to the dimensions given in the PDF below. Feel free to change the measurements and get creative with embellishments, pockets and machine embroidery.
When I finish the sides and the neck, I take the cording and lay it under the fabric casing I have made.
Then I fold the fabric over the cording and stitch along the edge.
Here are some other aprons I have cut out and have ready to go when I need a quick gift.
Now for the giveaway!
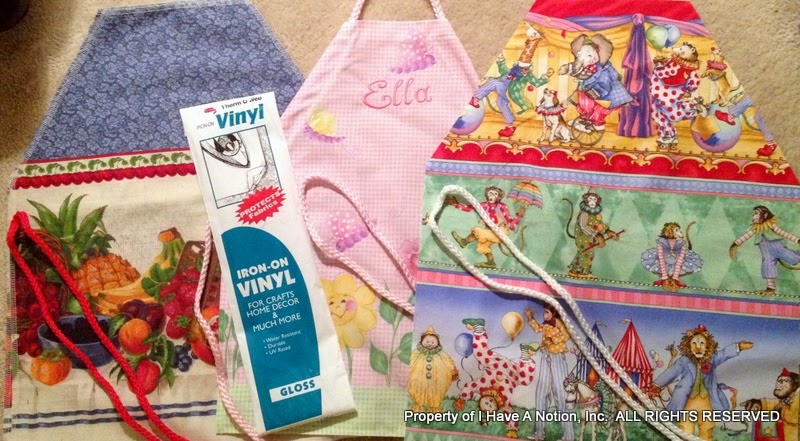
One lucky person will win a pre-cut apron from the fabrics of their choice pictured above, cording and 2 yards of Iron on Vinyl in the Glossy finish.We appreciate your stopping by, please continue to visit those bloggers who are participating in the hop. The links to their posts are below.
Monday, October 27th
SewCalGal - Event kick off
Tuesday, October 28th
Wednesday, October 29thSewCalGal
Thursday, October 30thSewCalGal
Friday, October 31stSewCalGal
SewCalGalJacquelynne Steves, The Art of HomeWendy Sheppard/Ivory Spring
Happy Hopping!
Smiles,
Kelly
What a fun post and great project idea too! Love seeing the photos of the boys when they were so young, as well as the idea of their "big boy" bibs. Looks like a great project for a gift, which would also work well for a project to teach a young person to sew. Either way, I can think of many parents and gparents that would like these for their kids/gkids. So cute. Great tutorial! I want to make them.
ReplyDeleteSewCalGal
www.sewcalgal.blogspot.com
PS - There is a particular stitch that you shared in the photo that almost looks like it was stitched on a serger. Looks like a great way to finish a seam. Curious minds want to learn more. Looks like a great locking stitch.
Yes, I did serge the edge of the fabric but you could use a zig zag stitch as well. If you don't like either of those methods, you can cut your fabric 1/2 inch larger on all sides and just fold in 1/4", press and fold it another 1/4" press and you'll have a finished edge.
DeleteThe aprons are just perfect for all kinds of crafts or cooking with kids! It was also fun to see the pictures of your boys when they were little, thanks for sharing!
ReplyDeleteGreat idea for moms. I am not entering since all my "children" are grown now.
ReplyDeleteThank you; I've been looking for this apron pattern for ages. This is going to be used SO much here!
ReplyDeleteThanks for sharing the idea about using the aprons as bibs for older children. I never would have thought of that. Definitely something I will have to try.
ReplyDeleteThank you for sharing such a clever project today.
ReplyDeleteThese aprons are so cute and clever! I love the ones you made for your Gentlemen Diners :-)
ReplyDeleteSuch adorable boys and having fun with those smiles! Your clever "big boy aprons" are fabulous. I have never tried iron-on vinyl. Sounds very interesting. Thank you for sharing Creative Kids Craft Bliss...
ReplyDeleteGreat models you have! They are soooo cute! Love the Aprons...very clever! Thank you for sharing your pattern with us too. Have a Grangirlie that will be delighted! :) Have never tried iron-on vinyl..actually hadn't even heard of it. Would love to win! & try! :)
ReplyDeleteSew much fun! Your pictures are so sweet! And what kid doesn't love having an apron of their own! Thanks for the chance!
ReplyDeleteOh, I just love this....what a fun project and even a younger person could do it. Your kids are adorable....what a fun mom!!
ReplyDeleteWhat a great idea for a giveaway--and for a present, too, for that matter. I might make some of these up and then give them to the littles in my life. Putting the finishing touches on them together would be great fun.
ReplyDeleteyour boys were so cute when they were little. It is fun crafting with kids.
ReplyDeleteFun! I SHOULD/need to make an apron for my daughter for painting!
ReplyDeleteGreat idea! I've used the fusible vinyl over cotton for the inside of a lunch bag. It's a great project! And kids aprons are always a fun idea. Thanks!
ReplyDeleteKelly, Hoffman Fabrics hasn't updated their blog to reflect the blog hop yet. I am wondering if you might nudge them...so we can leave comments and then be eligible for the 10 point entry! :) Or perhaps leaving comments on all the other blogs will be sufficient? I've seen lots of good stuff on this tour.
ReplyDeleteI was just asked to make an apron...and my MIL made them for my Daughter and Niece last Christmas!! Love them!!
ReplyDeleteWhat a great Idea. Cute and extremely functional. I know a few people who would love to have these.
ReplyDeleteI think it's a great thing to spend time with kids doing creative things. My son and I did crafts, although he was never interested in sewing. I also do this with nieces, nephews, or whatever kid is interested.
ReplyDeleteWould love to make a fun crafty apron for my granddaughter. Thanks,
ReplyDeleteKelly, those photos of your boys are just priceless! They are really cute now but OMG, just adorable back then!
ReplyDeleteThe apron is so cute! Great idea for young children.
ReplyDelete