
Hey, y'all, Karin here again, doing what I do best - hijacking Kelly's blog giving Kelly a hand while she is recovering.

The title of this post could just as easily have been "The Towels From H E double hockey sticks" but, it's not my blog, and I didn't want to offend any of Kelly's dear readers and friends. Be forewarned, this quick, short and easy project was anything but, and definitely proved the adage that the using right tool for the job makes the job a whole lot easier.
I had some Christmas fabric that I wanted to add to the bottom of the towels and I choose this design from Embroidery Library. I wanted to make the stars gold and the ornaments red...easy-peasy, right?

Well, you see all those little loopies and swirlies in the original design? Can you imagine trying to remove even tearaway paper stabilizer from all those tiny stitches? Darned near impossible, so tearaway is out. I could use water soluble, but even after a good rinse, that often leaves the towel stiff until it's run through the washer and I didn't plan on doing that prior to gifting. I don't like leaving cutaway stabilizer on towels that are to be used, so that was out too. What's left? Floriani Heat N Gone, of course! It's very similar to water soluble, but it gets removed with a simple pass of a hot iron instead of water. Perfect!
 So here we are, all hooped up, and ready to stitch. I've got my towel and one layer of Heat N Gone hooped together, nice and tight. I think puckers in machine embroidery are BAAAAD.
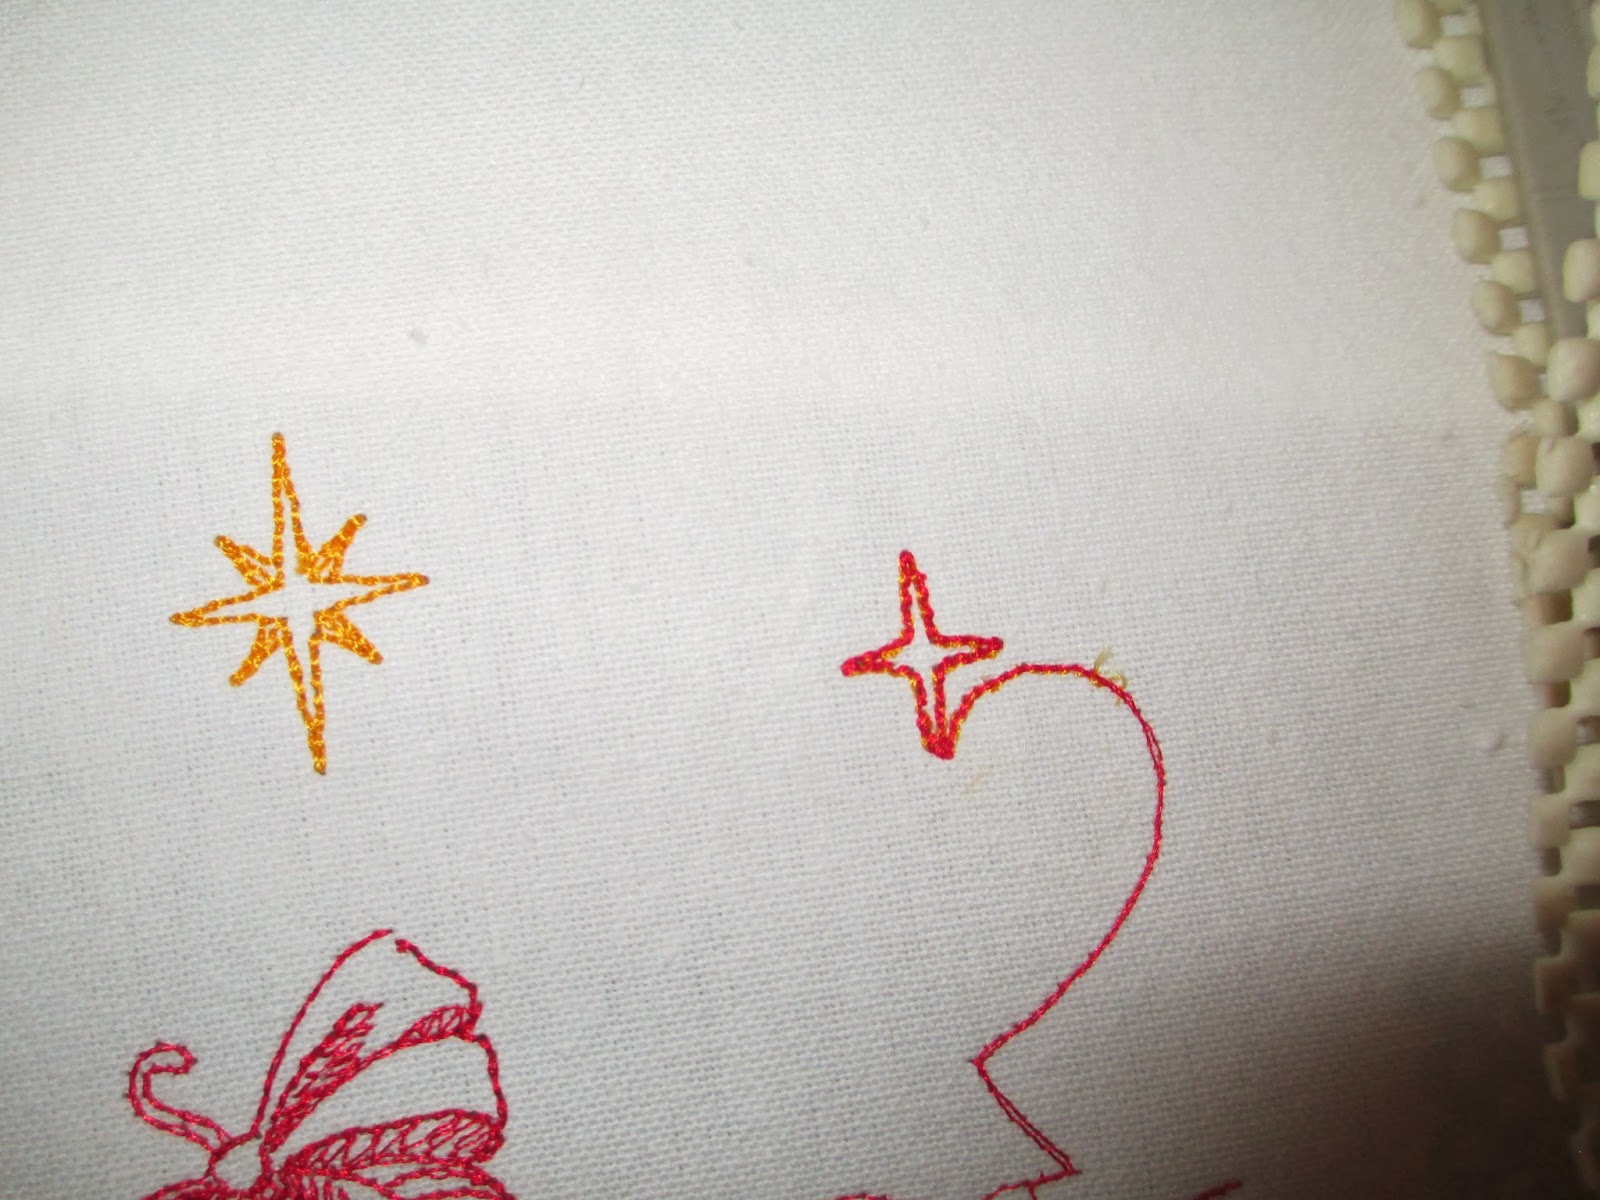
 I fast-forwarded a few stitches to see where I was going first, and it turned out my needle was at the top left star. Perfect, as I wanted to make the stars gold. You can hardly see it in the next picture, but I managed to get the first star gold, stop the machine, change thread and bobbin to red and continue stitching. Easy right? Haha, she says.
 Apparently I wasn't paying super close attention (I might have actually dozed off...just sayin) and lo and behold, the needle went right into stitching the second star before I knew it. It was almost half done before I was able to stop the machine. Oh, but once it stopped, boy did I have a
 mess situation in my hoop.
 First I tried removing stitches with my trusty Seam-Fix seam ripper (I call that reverse stitching, and it's a stitch I use more than I care to admit.) This wasn't your ordinary run stitch, though..oh no...it was double stitched to make it thick and visible. The seam ripper just wasn't cutting the mustard; surely there was a better tool in the arsenal.....

 Yup, that's the right tool for this job! Those little pointy tips were able to get under that thread and pull it right up for me to snip off.
Remember, though, I'm only a few minutes into this project and already I've made a mistake that cost me extra time and trouble. What happened to easy and quick? Surely I'll pick up the pace once I remove these stitches....after all, I've only got a short time to sew up 4 towels and this design is supposed to take 19 minutes to sew out. Oh wait, they didn't count on me changing colors so I have to add more time....
 It will be a cinch to swipe the Heat and Gone with my iron and remove all the stabilizer. Quick and easy..love that. Once again, the right tool makes
the job go easy.
It will be a cinch to swipe the Heat and Gone with my iron and remove all the stabilizer. Quick and easy..love that. Once again, the right tool makes
the job go easy.
Here is the design all stitched out. You can see the Heat N Gone - it's the shiny part.
 And, once again, those angled Famore tweezers came in handy to remove a couple of red underlay stitches that were peeping out from underneath the green swirls. Again, the right tool makes the job quick and easy. Thank you Kelly!

By now, I've got about an hour invested in this 19 minute stitchout.....ugh...and I've got 3 more to go. Ummmm...maybe not. I decided that I will do ONE more towel with this design (gotta have a matching pair, right?) and I'll cut one more piece of Heat N Gone then wrap it up and put it away.
I fiddled with trying to get that roll back into the wrapper, but you know that didn't happen. At least, not the way I wanted it to fit. Hugo's Amazing Tape to the rescue! I just wrapped the cellophane wrapper around the roll of stabilizer, wrapped a short piece of tape around it and called it done. I know I can rely on it sticking to itself without sticking to anything else or leaving any gunky residue, and when I'm ready to use the stabilizer again, a lift of one corner and it peels right off.
 And where do I keep all my stabilizer rolls you may ask? My sweet daughter gifted me one of those upright, hanging shoe holders and I just didn't have the heart to tell her I didn't have that many pairs of shoes...so I just put it away for a while. I just hung it on one of those over-the-door hooks, and there ya go! Might not be its intended use, but it sure works for me! (right tool, remember?)

Why two hooks over the door? Wait until you see the front.
 Here's what's hanging on the FRONT of the door...I had a $10 coupon for
Kohl's last year, and this baby cost $9.99, so, basically, it was free
and it was ME, so I just *had* to have it! The "IN" sign turns around
to show "OUT" when I'm not in the room. Handy when Driver has to come
looking for me and makes me smile every time I see it! I leave it (and
my other Halloween decoration: cobwebs) up all year..much easier that
way.
Here's what's hanging on the FRONT of the door...I had a $10 coupon for
Kohl's last year, and this baby cost $9.99, so, basically, it was free
and it was ME, so I just *had* to have it! The "IN" sign turns around
to show "OUT" when I'm not in the room. Handy when Driver has to come
looking for me and makes me smile every time I see it! I leave it (and
my other Halloween decoration: cobwebs) up all year..much easier that
way.
Brake's over, back to stitching....I've got another 19 minute stitchout, and then 2 more towels, whose design was still to be determined. I got smart on the second towel and decided to fast-forward my stitching so that I could stitch both gold stars at one time without having to switch colors in the middle. Quick, smart, and easy, eh? Haha, I thought so too...little did I know.
 Here we are, both stars stitched nicely, so let's switch back to red, and go do the ornaments.
 Annnnnd, what have we here????? Arrrrrgh. I turned my back to review my fabric (do you ever second guess yourself?) and look what happened! I'd forgotten the stitching order, and I stitched RED right over top of my (previously stitched) GOLD star! Arrrrrrgh. See, I told you, the towels from H E double hockey sticks!
 Well, use your imagination here....and trust me when I tell you that my Famore Angled tweezers saved my
 butt design once again. And here are the two towels, only 3 hours or so later all ready for their fabric trim. Good thing I picked such an easy and quick design right?
 Here they are after their fabric trims have been added. Good enough to gift, thanks to all the right tools from IHAN!
 Here are the other two towels I made. Notice the design I chose? Yup, it's a regular, solid and dense design. With approximately 3 times the number of stitches as the airy tree design. And these took about the same time to stitch out, and noooo, I didn't make ANY mistakes on these, and all I had to do was change the thread at each color stop and add the trim and fabric.
 This design is also from Embroidery Library, and it stitched out without a hitch. So now my towels are all ready to wrap up and fly to Alabama, with a few days to spare. Thank Goodness!
 Thanks for sharing all the trials and tribulations of my "Towels From H E double hockey sticks." I'm glad they're done, that's for sure! And I'm super glad Kelly and IHAN have all the tools I need to make my "job" easier and quicker, not to mention take care of all those self-created issues. These wonderful tools make GREAT stocking stuffers, so be sure to drop some hints around the house and see what turns up in YOUR stocking!
Thanks for reading!
Karin

(just for the description....no one was hurt in the making of this blog post :)
The title of this post could just as easily have been "The Towels From H E double hockey sticks" but, it's not my blog, and I didn't want to offend any of Kelly's dear readers and friends. Be forewarned, this quick, short and easy project was anything but, and definitely proved the adage that the using right tool for the job makes the job a whole lot easier.
I had some Christmas fabric that I wanted to add to the bottom of the towels and I choose this design from Embroidery Library. I wanted to make the stars gold and the ornaments red...easy-peasy, right?
(haha, little did I know...do you sense a trend here?)

Well, you see all those little loopies and swirlies in the original design? Can you imagine trying to remove even tearaway paper stabilizer from all those tiny stitches? Darned near impossible, so tearaway is out. I could use water soluble, but even after a good rinse, that often leaves the towel stiff until it's run through the washer and I didn't plan on doing that prior to gifting. I don't like leaving cutaway stabilizer on towels that are to be used, so that was out too. What's left? Floriani Heat N Gone, of course! It's very similar to water soluble, but it gets removed with a simple pass of a hot iron instead of water. Perfect!


How about if I try my Famore Angled Tweezers?

Remember, though, I'm only a few minutes into this project and already I've made a mistake that cost me extra time and trouble. What happened to easy and quick? Surely I'll pick up the pace once I remove these stitches....after all, I've only got a short time to sew up 4 towels and this design is supposed to take 19 minutes to sew out. Oh wait, they didn't count on me changing colors so I have to add more time....

Here is the design all stitched out. You can see the Heat N Gone - it's the shiny part.


I fiddled with trying to get that roll back into the wrapper, but you know that didn't happen. At least, not the way I wanted it to fit. Hugo's Amazing Tape to the rescue! I just wrapped the cellophane wrapper around the roll of stabilizer, wrapped a short piece of tape around it and called it done. I know I can rely on it sticking to itself without sticking to anything else or leaving any gunky residue, and when I'm ready to use the stabilizer again, a lift of one corner and it peels right off.


Why two hooks over the door? Wait until you see the front.

Brake's over, back to stitching....I've got another 19 minute stitchout, and then 2 more towels, whose design was still to be determined. I got smart on the second towel and decided to fast-forward my stitching so that I could stitch both gold stars at one time without having to switch colors in the middle. Quick, smart, and easy, eh? Haha, I thought so too...little did I know.


(actual stitching results)
Karin


