Announcement!

I Have A Notion blog and store have moved to:


the store can be found at


There is a much easier to navigate store, with new items. The blog has its own page as well... new content too.

The blog is now at www.ihaveanotion.com/blog

Please come and visit!

Tuesday, January 24, 2012

LUX Bar LED Task Light Follow Up & Perfect Alignment Laser (PAL) Product Review

 Before I get into my reviews, I thought I'd give you an update on the local wild life :)
 The Flamingo's were plenty warm in the recent snow and one actually was seen sledding from this miniature hill in the owners yard.  It rained yesterday...I should have run down there to see if the owners had put out enough umbrellas!!!  LOL

The LUXBAR LED Task Light I blogged about here arrived last evening.  I have had a chance to assemble the light and move it around the house a bit....I'm still very impressed with the LUXBAR Light.

Assembly is required but it was quite easy...just one screw and it was put together.
Some bloggers wanted to know how much the LUXBAR weighed so here is the skinny on it's weight:
I weighed the base and arm separately for those of you who may be interested in getting the LUXBAR Clamp Light. The arm of the LUXBAR Light weighs 11.5 oz and is approximately 19 1/4 inches long. 
The base of the light weighs 1 lb 11.2 oz and measures  apx. 5in x 7 in.
The silver knob extended out from the light is the screw that attaches the light to the base.  I left it in to show you how the light just slips onto the base.  I unscrewed the silver knob and pushed the light onto the base and re-screwed the knob and wah lah...it was put together.  The power cord, 74 inches long,  plugged into the black circle you see above the knob.   No tools required!!
The silver knob in this picture is how the LUXBAR can be adjusted by loosening and tightening that knob the light holds it's position snugly.  No bumping or moving makes the neck droop.  The LUXBAR rotates 90 degrees....basically up and down and side to side.

So I bet you are wondering how bright the lights appeared in a real house right?  This is a photo I took of the LUXBAR sitting on my kitchen table with the lights in the kitchen turned off.
I raised the head and took a photo as well....ya just never know who's going to ask for that photo so I thought I'd just beat them to the punch :) 
Then I brought the LUXBAR down to my sewing table.  Remember, I bought the one with a base and didn't get the additional clamp (yet...but I'll be getting one).  I had not really thought about using it next to my sewing machine because I have a Bendable Bright Light on my machine and it illuminates up my machine foot area wonderfully. 
A blogger friend, Perry,  wanted to see the LUXBAR demonstrated near a sewing machine so here you go :)  Above it is sitting on the base next to my current sewing machine.  My old machine has a Sew Steady Table so I also got it out and held the light arm to the acrylic table.
Above I'm holding it on the back of my Sew Steady Table and below it is in the front.
Since the arm is so light I believe it will hold onto the Sew Steady Table and not tip the table at all when I get a clamp.  You can see it does illuminate the entire sewing bed. 
 Here is  a photo of the LUXBAR sitting on top of my Sew Steady Table.  If I were just doing some piecing and wanted more light this would be just fine.  I certainly would not want it there for quilting or any large projects as it would be in the way on top of the table like this.
This light bar is what was supposed to give me some beautiful bright light....nope...after having Mr. McSteamy install this light and throwing the box away.  The only lights that can work in this light bar are not bright enough to illuminate my sewing area...and when I changed the bulbs to brighter bulbs....the light smells like something is burning.  I wish I had never bought it for this purpose in the first place.
Bottom line is I feel comfortable recommending the LUXBAR LED Task Light and I'm going to be enjoying mine.  If you are in the market for a new Task Light, I'm offering IHAN Blog Readers a special price through the end of January :) 

Many of you are into Machine Embroidery so I thought I'd add a small review of the Perfect Alighment Laser (PAL)

The PAL is a laser that assists people in centering their ME projects in the hoop.  It can also be used in beading, scrapbooking, drawing etc.


You can see the laser here...it is lined up with the centering lines on this hoop.  Now I know exactly where the center of my design needs to be.  I took the PAL with me recently and asked some experienced ME gals what they thought of the PAL.  They've been hopping for years so they didn't need any additional help in centering their designs.  I think if you are new to ME hooping and want guidance the PAL does help align your design in the center.
The PAL is also advertised as another method of sewing perfect seams.  The light can be positioned so that the laser marks the distance you want from your foot or needle and you use the laser light as a guide.

The Perfect Alighment Laser comes with 3 AAA batteries and a USB cord to plug it into your sewing machine USB

 What I think the PAL is also good when you want to embroider a name or word next to a design or on a garment pocket.  I would line up the laser and follow the horizontal line so the lettering would be straight and not slope down hill.  If you were putting a name next to a pocket for instance....you cold align the laser with a button or the edge of a pocket to be sure it comes out straight.  I hope this is all making sense....I'm certainly no expert...as you know.
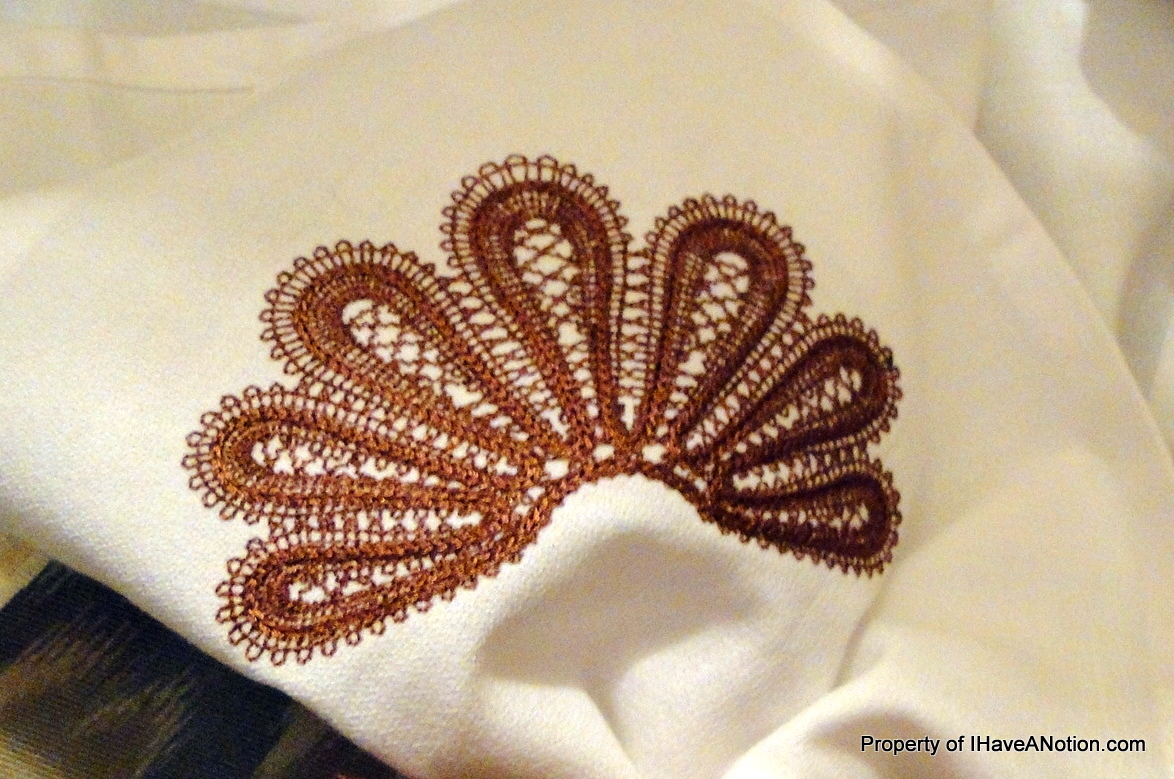
This is not my embroidery piece, it was given to me by a friend.  If I wanted to go back and hoop the block and add her name I could be sure it would be placed correctly. 
I'll also embed a YouTube video here so you can see what I'm talking about.


For a video on Continuous Embroidery Alignment...you can click HERE!

I hope all of this information is helpful to some of you.  I'm off to the post office now....I'll check on the Flamingos to see how they are doing today.

Smiles,
Kelly

Monday, January 23, 2012

Practice, Practice, Practice....with Patsy Thompson

If I've been told once, I've been told a thousand times...practice, practice, practice....and then practice some more and you'll improve you Free Motion Quilting skills.   That's just what I did yesterday...I spent 4 hours with some friends and we all had a chance to practice and learn from Patsy Thompson

Having Patsy work with each one of us at our own pace and level was wonderful.  I'm more of a beginner and my only goal is to be more comfortable and do what ever it is that I can do, without wanting my work to look a certain way.  I don't aspire to become an incredible quilter....I aspire to love the process of making my quilts and have some tools under my belt to be able to do some of my own quilting.  I wanted to practice some Free Motion Embroidery, Trapunto and play with a variety of weight threads....and I certainly had my chance. 

Before I show you my "progress," I thought you'd like to see some of Patsy's work.
 I like the contrast between these two pieces. Patsy used her Appli-K-Kutz die to cut the same feather for each quilt.  It is the weight and choice of threads that Patsy used in the second quilt that makes it look so very different from the first.  

I so admire her choice of colors and how she has chosen to put these pieces together.  Patsy has added Machine Embroidery to her quilting and I absolutely love this corner piece shown above.

You may have already seen this table runner on Patsy's blog.  In real life...it is so much more than what it looks like in photos. 

 Here is the center block....in the photo it looks like the fabric in the center is what gives it the change of color....nope....
Look at the Machine Embroidery....I just love it added to her designs....it really grabs me.

 Here are a few more samples her free motion quilting.
 Ok, remember when I said that I just want to improve what I do?  Take a little break....blink a few times...other wise you just might miss just how nice my piece really is....LOL.
 It may not look like much to many of you, but to me this is a sign of real progress and I had a ball stitching on the applique shapes.  The other thing I loved is playing with the different variety of threads.  I had first stitched the little veins on the leaves in the lime green color.  Patsy suggested I use some Floriani (PF 516-the gold tone thread above) thread just inside the lime green and it would make the leaves really pop.  She was absolutely right!!! (No surprise there...but it is incredible to see before your very eyes).

I'm not finished with my flower yet.  Patsy suggested I use Invisifil Thread to go around my flower after I had done the thread embroidery and then do some quilting.  When Patsy says that many quilters under utilize their thread...that is so true of me.  I'm going to continue my Free Motion Quilting practice and use lots of the variety's of threads I own.

The stitching in red in the upper right corner....that's my very first time ever doing any Free Motion Quilting....so as you can see....I've come a long way!!!

Patsy suggested using fabric grade Silicone Spray on the bed of my machine and it really did help quite a bit. I think I was getting tense because my fabric was not sliding as well as it could have in the beginning....just more Practice, Practice, Practice :)

SewCalGal's Free Motion Quilting Challenge is going on so I'm going to have to take more pictures of my practice and submit them.  

Smiles,
Kelly   

Thursday, January 19, 2012

My Quest For More Light


When I went to Quilt Market back in October, one thing I really wanted to research was table lights. I have 4 lights, all from the same company, and I'm not happy with any of them.  They are not bright enough for me and the hinges don't stay even after being tightened.  I'm not going to tell you the brand...but I will tell you they were not cheap.  (I bought two, won one and was given another)

I decided I was going to fiddle faddle with every single light I could find while at Quilt Market until I came across a table light I could not only use for myself, but also one that I could recommend to others with confidence.
  
The   LUX Bar Table Light and  LUX Bar Clamp Light were by far my favorites lights.  (The same light with two different bases essentially) 


I was impressed with the engineering and mechanics of the LUX Bar LED Light after it was put through the IHAN bump, smack, push test and passed with flying colors :)  I really like the LEDs too...it is really bright.

The light area is 36 inches...I took their word for it...I didn't measure it!   The arm is 19 inches the head swivels 90 degrees.   The LUX Bar Light is advertised to have 50,000 hours of light.....1 year = 8765.81277 hours so you do the math (I'm not going to calculate the years....let's just say it's a very, very, very long time ay?
I gave the LUX Bar Clamp Light that was attached to their booth a few good bangs too, just  to see if it would droop and it didn't.  The next day I checked back and  and it was still in the same position, ummmm Very Good!
The clamp opens 2 1/2 inches and has pads where it comes into contact with the table, both on the round part and where it meet the top of your table.  No scratching the table on either side...that's very nice too.

 
The other lights I thought were nice are the Luxdome Task Lights and you can see them on the right above.  They would be nice for a desk or computer area but I was mainly interested in a table light for my sewing area. 

So...I bet you are wondering where's a photo of my LUX Light right?  It's on it's way and when it arrives I'll be sure to share more photos :)

I have something else that is Mighty Bright to share with you too.  It's the Mighty Bright Microclip Lights.
I've had a Microclip light for a few years and I keep it clipped to my bussom pad pin cushion.  I love this little light and I always forget to tell people about it. 
 It's really not such a strange place to keep it at all....you wanna know why?
 
Because it is within reach when I need to check for threads hung up in my bobbin case.  Ever try to see up in there?  Not so easy is it? 
 When I'm at a retreat and I need to get up in the night and I can't turn on the lights...I cup my Mircoclip Light like this...and turn my hand over and it illuminates my path.  Here I'll show you...let me go turn off the lights....
See....it doesn't shine all over and into people's faces...oh I'm so thoughtful...LOL. 

Another very cool thing is the little light swivels...I'm not kidding!
See the little acrylic head, you can adjust the position.  Handy little fellas they are! 

When you get to mid-life or past...you start to appreciate the finer things in life...like good shoes, a good bed and some decent light!!!

Smiles,
Kelly

Wednesday, January 18, 2012

Nancy Lee's Machine Embroidery

I am fortunate enough to know a a few women who really know what they are doing with Machine Embroidery and they have been educating me since I  became interested in ME.  Both of them told me their first preference for stabilizers and thread is Floriani.  After hearing about how wonderful Floriani products are, I did some investigating and became a Floriani Dealer last November.

Today, I'm going to introduce you to one of those really smart ladies...this is Nancy Lee....Nancy Lee, I'd like you to meet the IHAN Blogifers. 

Nancy Lee has been sewing all of her life.  Over the last 20 plus years, she has been doing machine embroidery and the last 5-6 years she has been quilting.  With all that experience you know when Nancy Lee tells me  to put my metallic thread spool upside down on my thread holder...I do it... without even a slight hesitation! 

Nancy Lee allowed me to visit her home and photograph some of her projects in December.  All of her projects shown here were made with Floriani Embroidery Thread and I've noted the designers beneath the photos.
(Embroidery Design by Smart Needle)
 These sandals cracked me up.... it makes me want a swimming pool and a margarita for sure.
(Embroidery Design by Momo-Dini)
Nancy Lee took a third place ribbon in the Tote Bag Category at the Kaleidoscope of Quilts this past year.
I really like the close up of this design...didn't it come out nice?
 (Napkin ring Embroidery Designs by Advanced Embroidery)
These napkin rings are snowflakes and Nancy Lee had made several that were just beautiful. 
Thanksgiving napkin rings...aren't they just perfect for Thanksgiving?  Nancy Lee even embroidered her napkins...
Neat ay?  Now we just need an invitation for Thanksgiving Dinner!!

(Embroidery Design by Zundt)
This bag is a ribbon winner for Nancy Lee.  She received a 2nd place ribbon at the American Embroidery Conference in 2011.
The butterflies are three dimensional and really make this bag take off...pun intended :)
 (Embroidery Design by Julie Hall)
I thought this wine bag was really cute.  When I give people a bottle of wine...it never has a bag...I think this just may need to change.
 (Anita Good Designs)
A book mark is a nice personal little gift or treasure to have.  My boys are always looking for their book marks...I think I should make some with their names on it so they'll know who it belongs to.

Time for a confession....yes...another confession!!  I have this thing for dish towels and bath towels.  I love dish cloths with embroidery.  I've received a few as gifts and I'm telling you they are so much fun.  Perhaps because can make me smile when I have to do a dreaded chore.
If this doesn't make you giggle....well...just giggle will ya?  It won't hurt a bit!
Loralie has some very fun designs too.  Nancy Lee took the time to show me how nicely the Floriani Stabilizer tears away from the design.
Look how nice and clean the back is.
This pix is enlarged a bit to show you the centers of these lace snowflakes.  Nancy Lee used Floriani Wet N Gone Stabilizer and Angelina Fibers (center)....they really are so beautiful and the addition of the Angelina really pop these snowflakes, don't ya think?
(Jenny Haskins Designs)
Nancy Lee has made so many beautiful things that it was difficult to pick and choose the photographs for this post.  I thought I'd end with this one because I'm so impressed with how fine these flowers came out. 

Beautiful aren't they?

I'm going to leave you with some of the things Nancy shared with me about her experience with Floriani products:
"Floriani thread is my preferred thread because it shines beautifully like rayon and it glides through the needle.  Rarely does it ever fray or break and if it does, that usually means I need to change my needle.

Floriani Stabelizers are the best and I've never been disappointed.  The outcome of my projects really shows how nice the stabilizers are.  Everything comes out beautifully."  
Nancy Lee White, OH Dec, 2011

I have been using the Floriani Thread and Stabilizers since November and I've been more than happy with the results.  My needle never once got sticky when I used the Perfect Stick Stabilizer and when I used another brand my needle was covered in a gummy substance...not good.  The Floriani Thread is absolutely beautiful no doubt about it....so I've been very pleased.  Time has been limited with year end inventory and book keeping with IHAN so that stuff gets in the way of having fun with Floriani of recent.

Floriani has a Year End Sell Out Promotion going on until the end of January so if you want to take advantage of Floriani Thread at 50% OFF and other excellent deals...click here for all the information to order from I Have A Notion :)

Thank you Nancy Lee for sharing your time, projects and insights with me!

Smiles,
Kelly

Monday, January 16, 2012

Winners


We are all winners...but you didn't need me to tell you that.  I feel like I win the most because I have the good fortune to meet so many interesting and wonderful people.

Speaking of Interesting People....today is Martin Luther King Jr. Day here in the US.  I hope everyone stops today, if even for a moment, to remember THE DREAM.    In the photo above you mostly see people with black skin....but THE DREAM is for all people, ever where, no matter their color, religion or socio-economic status or education.  We are ALL important, we ALL matter and I Have A Notion that each of us have our own important tasks in continuing to bridge the gap between all people everywhere.

I've witnessed many stitchers and quilters stitch beautiful relationships across all the gaps and wrapped one another in love and beautiful quilts without concern for any of the politics, religions, finances or education of one another.  I'm proud to be a quilter  :)

Quilters need tools to do those jobs and speaking of which...we have some announcements to make....

For those of you who had not heard of Famore Cutlery, you can't say that any more!  Famore Cutlery makes scissors for several different companies.  The stamping on the scissors will have the other companies logo. Perhaps more people are familiar with Simplicity's Jackpot Scissors or Floriani's Machine Embroidery Tools...both made by Famore

BY THE WAY:  I noticed several people have ordered Famore Products and the Postage Calculator on the IHAN website has overcharged you for shipping.  You will be credited for the postal overage...no worries :)


Congratulations Pam!!! 

The Winner of Learn To MAKE A QUILT from start to finish is


Congratulations Penny!

And the winner of GARDEN PARTY Stitchery is.....

Congratulations Diane H.!

Pam, Diane and Penny please e-mail me your full names and addresses so I can send out your gifts.  (IHaveANotion@yahoo.com)

Now I have to run over and see who won the other Famore Blog Hop giveaways! 

Smiles,
Kelly


Translate

Related Posts Plugin for WordPress, Blogger...