
Guest Post by Karin
I have this charm pack of fabric and I never know what to do with squares - I usually start with strips or yardage. So here's what I'm doing with it:


 Rotate it 90 degrees, and fold it in half again, still right sides together. Finger Press again.


 Next verse, same as the first. Do it until all middles are pinned to their corresponding edges:
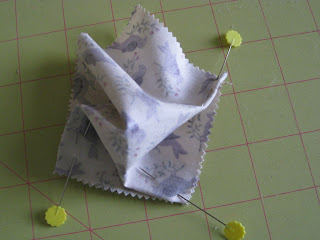 So now you've got a lumpy charm, with 4 pins in it right?
 Neatly flatten out that lump, so it looks like you have a 3-D square in a square:


Rotate and repeat. See the pattern?
 Go all the way around, and take another stitch right next to your first stitch, so you now have another square in a square:
 Give a good tug on your thread (should still be in the needle), and draw all the edges together:
 Now pinch to adjacent folds together and whip stitch them closed. Remember, you don't have to make your stitches pretty, but do try to go through all 4 layers:

 When you get to the end of those two, go back to the center with your thread, and start stitching the other two folds together:
 When you're done, they should be nice and neatly stitched together into a line:

 Gently tug the corners of the bow out:
When you've piled up a few, give 'em all a good press, making sure to straighten out the sides, so that everything keeps pretty square. Sew them all together in any combination you choose. I'd suggest pinning, to keep those layers straight and square.

 Karin
Karin
I have this charm pack of fabric and I never know what to do with squares - I usually start with strips or yardage. So here's what I'm doing with it:

Fabric is Lilac Hill by Moda
I started by laying a charm, face up. 
Fold it in half, right sides together and finger press it.


Easy so far, right? OK, here's where it gets hairy, so don't say I didn't warn you. Flip your charm over, so it's face down. Pinch the edge right at one of the middle folds, and bring it to the right, to meet the corner and pin it there (you may certainly go left, if that's easier for you):

Rotate the charm 90 degrees, clockwise and do that again:


OK, here's where you break out the hand-sewing needle. Wait, don't drift off just yet - I know, hand sewing's not my favorite either, but this is really REALLY easy. And you can do it while you're watching TV, so you can do this instead of snacking (one of my REALLY bad habits!).
Single strand thread is fine, and please, don't be too fussy about the size or even placement of your stitches. Make a knot in the end of your thread. About halfway down one of the smaller square's side, slip the needle between the base fabric and the 3D square, and poke it through, coming out towards your other hand (or your face, whatever is most convenient, just don't poke out your eye at this point, 'cuz you're gonna need it in a minute).


Rotate and repeat. See the pattern?


Take your pins out and flip your charm over:

When you've piled up a few, give 'em all a good press, making sure to straighten out the sides, so that everything keeps pretty square. Sew them all together in any combination you choose. I'd suggest pinning, to keep those layers straight and square.

There you have it - a fun and easy way to use charm squares.

