Announcement!

I Have A Notion blog and store have moved to:


the store can be found at


There is a much easier to navigate store, with new items. The blog has its own page as well... new content too.

The blog is now at www.ihaveanotion.com/blog

Please come and visit!

Thursday, October 13, 2011

A Quilt Show by the Founders of the Mountain Laural Quilt Guild

Warning: Get a Big Cup of Joe and prepare yourself for this wonderful adventure.  Because there are so many photos...I'm going to do this in a two part blog post.  I'll post about the first presenter and then I'll post about the second presenter.

PART ONE

The main reason I "went fishing" a few weeks ago was to be present of the presentation by the Co-Founders of the Mountain Laural Quilt Guild in Wellsboro, PA.  This was very exciting for me because I'm a member and I'm fortunate enough to have both of these gals as my friends. 

The meeting is held at the Gmeiner Art and Cultural Center.  We arrived very early that night to set up all the quilts.  Oh heck, before I go into that....let me tell you who the co-founders are...good idea ay? 

They were introduced as the "Founding Mothers" and their names are Mary Jane Ehlich and Madalene Murphy.    What I think is really cool about these two ladies is they have very different styles.  Mary Jane is a traditionalist and Madalene is an art quilter. 

Mary Jane presented first:


This is Mary Jane's first quilt, Churn Dash (1984).  It was made from stash fabric and Mary Jane said she didn't know about sashing back then.


Yes, of course it is hand quilted...they all are.  Mary Jane not only is a master hand quilter but also is a master at needle turn applique.  I don't know if you can see the stitches very well...I'm telling you they are beautifully even.
Also in 1984, Mary Jane made this "Ruffled Tulip." She had joined the Charlotte NC, Quilt Guild and took an applique class from Dot Brickman who designed the pattern. She used polyester fabric and poly batting.

This was just her second quilt and she began taking ribbons with it. How exciting is that? Your second quilt and you are getting ribbons. All I have to say is....IMPRESSIVE!

1986 rolled around and Mary Jane made this "Dutch Girl" quilt that she had copied the pattern from a quilt her mother had made for her when she was young
 
It hangs in the hallway upstairs, right next to the room I get to sleep in...and while I'm bragging a little...I sleep with as many quilts as I need to stay warm!  Ok, I'm done now...can you tell I adore Mary Jane?  Yep, I do!

The next one was made in 1988, "Grandma's Bridal Quilt" has a matching long pillow sham.  Mary Jane took a class from Sue Carter who designed this pattern.  The quilt was chosen to represent the state of North Carolina in an exhibit "America Makes Quilts" in the Houston Quilt Festival in 1988.  It was juried into the American Quilter's Society Show in Paducah KY in 1989 and it has received a number of awards throughout North Carolina. 

The second quilt takes a collection of ribbons and her 4th goes to Houston and Paducah....isn't that amazing?  And wonderful?  I sure think so :)

I should tell you, between the lighting and flash...it was difficult to get really good photos of all of the quilts that were shown.  I did my best to fill in a bit of light.  Ya' all know I'm not a professional photographer right? 

 Made in 1988, and titled, "Rings of Joy" also was a big hit.  The center block was from a pattern in Quilter's Newsletter then she choose other patterns that she liked to built this quilt by enlarging patterns the the size she wanted. "Rings of Joy" was juried into the Paducah show in 1989 and chosen to be featured in the 1991 Quilt Art Calendar for December. It received several awards as well.


I took the close up so you could see the beautiful hand quilting.

This "Doll Dresden Plate I" made in 1990, is one of my favorite quilts made by Mary Jane. I see it when I come down the stairs. Mary Jane had made several large Dresden Plate quilts and she used her scraps to make this little one for herself. She gave the larger ones to loved ones.

"President's Wreath" (1991) received the judge's choice award a the North Carolina Quilt Symposium in Raleigh, NC in 1994.  The border was Mary Jane's own design. 
 
This one has an interesting story.  "Needle in a Basket" (1995) was made from Liberty of London fabric while traveling to Australia. 
The day after finishing the quilting, Mary Jane felt pain in her arm.  While at the doctors office she asked him to look at her arm.  Guess what was in her arm?  Yep, you guessed it, a needle...yikes!  Hence the name, "Needle in a Basket."

"Mother's Frustration" was completed in 2001.  Mary Jane's mother had started this quilt over 35 years before and she never finished it.  Apparently it would not lay flat so it just went unfinished.  Mary Jane took it all apart except for the arcs and made a template to re0cut the arcs and replaced the white background fabric.  She hand quilted and finished this heirloom quilt.

It sure lays flat now doesn't it?

This photo does absolutely no justice to this quilt, "Cross Country Plates" (2004).  When it is on Mary Jane's bed it is absolutely breath taking.  She made it for her husband, Bill and collected the fabric while traveling to Oregon.  Bill is very patient when waiting for Mary Jane to stop at quilt shops.
Look at the quilting....the scale...it blows my mind that Mary Jane patiently marks her quilts and proceeds to hand quilt all of her quilts.  I can't even begin to imagine the amount of thread used.

In 2004, Mary Jane made her "Lynchburg Pineapple 3."  This is her own design. 

The light here doesn't show the colors as well as the photo below.  This is "Ponchatoula Oak Leaves" made in 2007.  Mary Jane bought the pattern in Ponchatoula Louiasiana and made some changes to the pattern.  She started the quilt in Jan. 2007 and finished in in Oct. 2007.  She used 790 yards of quilting thread.  So much for quilt in a day ay?
I think this photo shows the colors much better.

While in Texas, Mary Jane slept under a quilt just like this one.  She was so impressed she made one for herself and it was made with 100% hand stitching, including the binding.

Made in 2009, "Christmas Coxcomb & Currants" was a pattern Mary Jane took from Quilters Newsletter Dec. 2004.  She started in it Feb. 2008 and finished in in December 2008.  There is 640 yards of thread used to hand quilt this beauty.
Again, I think the colors are better in this photo.

"Trapunto Red Bird" was made in 2009.  Mary Jane fell in love with the fabric so she fussy cut the birds and trapuntoed behind them.  It is her own design.
I know you are probably tired of all these photos...but once again, the close up is better!
I had the good fortune to watch Mary Jane while she was making parts of this beautiful quilt.  "MJ's Flower Baskets" was made in 2010.  The baskets are hand pieced with needle turn applique.  The pattern is by Lori Smith.  It was a pattern for a wall hanging but Mary Jane had it re-sized for a bed quilt.

"Tuesday's Baltimore" was finished this year.  I remember when our Tuesday group said they wanted to make a Baltimore Album and Mary Jane politely suggested I not participate.  She knows me well!  I would still be working on the first or second block and be frustrated that it wasn't as beautiful as the other gals blocks.
This was the last quilt revealed and you should have heard the gals whispering.  People were saying how different it looked hanging on a quilt hanger.  We had all seen it (long time IHAN blog followers probably remember my posting these blocks in their early stages)....but on a wall it was stunning.

After 6 or 7 hours now...I'm taking a break.  I didn't proof read this post....so if you see anything strange...just pretend it belongs there...I'll be sure to return the favor :)  I'll be back with Madalene's Quilts soon.   If you are still with me, thanks so much for spending your time with me...and my friends too!

Smiles,
Kelly


Wednesday, October 12, 2011

Raise Your E-Notion IQ- Scissors of All Sorts

EDITED 9:00 AM 10/12/11
Yep, it is Wednesday and time to raise your e-notion IQ.  It is also a special day because I'm a visitor at Sew We Quilt today and in order to read the post.....ya gotta click here to get the skinny. (No, I didn't say get skinny....heck if all it took to do that was a click....I'd be nice an trim..LOL)

Now I mention it...maybe all it does take is a click....head over to visit Madame Samm and you'll see how thin I am today!    If you leave a comment there....you will have an opportunity to fatten your notions stash....check out what she is giving away today:


Today's giveaway is open to EVERYONE...good luck to you and thanks for visiting.

Smiles,
Kelly

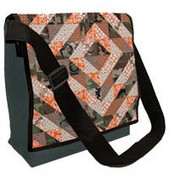
OH MY WORD....I almost forgot about telling all the visitors about the DEPLOY That Fabric Blog Tour that I'm participating in..  You have the opportunity to win not only this really great book...it really is great!  But you also win Camo Quilt-Eco Messenger Bag:
The Blog Tour ends on Oct. 14 .... 2 more days.....so consider yourself invited.

Tuesday, October 11, 2011

Free Motion Magic with Patsy Thompson

This past Saturday, my friend Jean and I took a Free Motion Quilting class with Patsy Thompson


We seem to always have fun together and when Patsy Thompson is in the room, you are guaranteed to have a great time and learn to expand your free motion quilting skills.
Patsy started by showing us how to practice some designs on paper before we attempted to stitch them.  Some us don't draw well on a straight line much less going drawing South, North, East and West without picking up our pens.  So I was thinking, "I sure got some learnin' to do."
 
You can see Patsy is quite proficient at drawing in all directions.  It is absolutely fascinating to watch Patsy quilt.
 She holds both sides of her fabric sandwich lightly as she glides it under the needle.  Patsy uses Silicone Spray on the acrylic sewing surface of her sewing machine.  I was surprised to see how well it worked.  Patsy knows what she's talking about....the Silicone Spray works very well.
LUNCH BREAK
 
This is Karen Karr and she was in our class as well.  Karen has taken other classes with Patsy and clearly has made some impressive progress.

She brought this quilt to share with Patsy and the class.  Karen's quilt took First Place at the Wood County Fair.  You can't really see all the quilting that well in this photo...trust me is was beautiful!
LUNCH BREAK IS OVER
Using the Trueflex Ruler, Patsy taught us how she starts with a curved line and then adds leaves and feathers to the lines.  What a nice way to get consistent curves. 
 
 I just loved watching Patsy draw these designs...she makes it look so easy.

This is Patsy's quilting...clearly not mine :)
I headed back to my sewing station and got to work.  Lets just say, I'm making progress....and leave it at that.

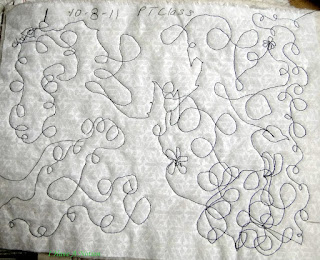
I finally got into the swing of things and noticed I was creating my very own designs.
 
While doing some random practicing I noticed I had made this design below.
It is an original...exclusively mine...and I'm calling it "Echoing Butts"....because that is what it looks like...LOL.
I went back to look at some other designs I had made and I then saw the theme...more butts!  Doesn't that echoing stitch look like a rear end?  Hmmm...what does this all mean? 

As the class was wrapping up Patsy offered the samples she had made during class to the students.  (internal thoughts...Feet Don't Fail Me Now!!!)
 I asked her to autograph it and I'm going to put it in my sewing area so I can feel the inspirational vibes when I practice.
Patsy is an excellent teacher and was very patient with everyone.  I can't even begin to tell you about the quilts she brought to show...you'll have to check out her blog to see all those amazing quilts.  She told us we were such a quiet class.  Well yeah we were quiet....her quilts were breath taking and I dont' talk when I'm admiring such beautiful art.  If you want to take a class with Patsy Thompson, she has several excellent DVD's and you can have your own private class with Patsy.

When you visit Patsy's blog, make sure to check out her new passion, Machine Embroidery.  She has added some beautiful ME to some of her designs.

Smiles,
Kelly


PS...almost forgot to tell ya, I'm going to be on Sew We Quilt blog tomorrow.  AND you know what?  The giveaways are now open to everyone, no sponsors needed!!!  So get over there get to leavin' comments :)


Friday, October 7, 2011

501 Rotary-Cut Quilt Blocks and The Border Workbook Book Reviews

I hope everyone is having or has had a wonderful Friday!  You may recall this post where I spoke about building my quilt reference library.  Today I have two other excellent books that are wonderful if you are wanting to build your quilt reference library as well. 

The first book is 501 Rotary-Cut Quilt Blocks written by Judy Hopkins and published by That Patchwork Place.  There are a few things I sincerely appreciate about this book.  The first is the Gallery of Blocks on the first few pages of the book.  All 501 blocks are included and they are in color, as you can see below.

The colored blocks makes it very easy to see the shift in the piecing and design. I choose my own fabrics (that is what makes it original for me).  Another thing I appreciate about this book is that each block has an extremely well written diagram with labeling.  Depending on weather you want a 4 1/2" up to 12" block there are diagrams showing you the dimensions to cut your fabric.   This is a no-fail book....if you can read and look at the diagram....everyone can cut the blocks.  If I've said it once, I've said it a thousand times....I'm visual and I need the directions to be extremely clear...and I"m telling yo,u Judy has done a fabulous job of accomplishing clarity! 


Janet has done a great job of explaining how to choose fabrics for the border as well as a discussion about weather or not to put a border on your quilt.  I find these discussions very helpful.  They stretch my thinking and give me great ideas that help fuel my creativity. 


There are 27 different borders to choose from-although you could combine a few of them to increase your options and stretch your creativity.  You can choose one for the sashing, another for your borders and/or make them smaller to outline your blocks if you like.  The possibilities are only limited by your imagination and creativity. 

Each of the designs in The Border Workbook, comes with a table for planning your border.  It explains great directions for determining the length of your border based on the number of repeats you will need to fit your quilt.   Below that table there is another table that gives the exact measurements for cutting each piece of fabric for the border.   Following that information are excellent diagrams that show how the pieces are fit together.  There are arrows and numbers on the diagrams that illustrate the placement of each piece and the order of sewing the pieces. 

At the end of each border there is a table that helps you calculate the size of blocks needed to change the dimension of your border pieces.

Here is an example of the clarity of the diagrams and instructions.   You will find the foundation pieced border patterns in the back of the book.  I just love the clarity of directions and diagrams!
 
Both 501 Rotary-Cut Quilt Blocks and The Border Workbook are part of my quilting reference library and I highly recommend each of these books.  In fact, I like them so much and want others to have the opportunity to build their quilt reference libraries that I'm running a special.  This special is available to IHAN Blog Followers ONLY.  CLICK HERE and see the nice discount you will get if you purchase both books before Monday, October 10, 2011.
 
Tomorrow I'm taking my first offical machine quilting class with Patsy Thompson at a local quilt shop.  I can hardly wait.  I hope you all have a wonderful weekend as well.
 
Smiles,
Kelly

Translate

Related Posts Plugin for WordPress, Blogger...