Announcement!

I Have A Notion blog and store have moved to:


the store can be found at


There is a much easier to navigate store, with new items. The blog has its own page as well... new content too.

The blog is now at www.ihaveanotion.com/blog

Please come and visit!
Showing posts with label Bendable Bright Light. Show all posts

Wednesday, February 20, 2013

Beautiful Couched Threads and Free Motion Embroidery by Jean Overmeyer


Jean is going to be teaching, "Expressions of the Heart" at the Kaleidoscope of Quilts this July for the Glass City Quilt  Commission.  I'm a big fan of Jean's and was fortunate enough to have taken her class this past Sunday.

PLEASE NOTE:  The Glass City Quilt Commission will post a list of classes for the Kaleidoscope of Quilts on March 1, 2013 and registration for classes begin March 15, 2013.

There were lots of samples and ideas laid out on the front tables.  My camera started to make noises....I just knew I was going to be at  it's mercy.

One might think this was staged, but Jean actually keeps her fabric on these mini bolts.  I love this idea because I'm so tired of sorting through bins and containers.  I want mine all nice and neat like this too.  I've actually added Fabric Organizers to the IHAN® website.  I'm definitely going to start the process....but that is a side point...sorry for digressing.
Jean has embroidered the name of child on this one.  Since it takes so much time to make a baby quilt, how about a baby mini quilt for the wall instead?  I love Jean's idea....so much faster to put together for a baby shower gift.  This design would be lovely as a wedding gift as well.


 As you can see, the heart theme doesn't have to be for Valentines day....this design can be used for almost any occasion.  This one in Christmas fabrics is fun. 

See, I told you my camera was noisy!  It has a mind of it's own, I'm telling ya.
"Expressions of the Heart" incorporates thread couching, free motion embroidery/ thread painting, applique, and free motion quilting.  
Before the class started, Jean showed us several examples of these techniques that she has used on several pieces she has made.  
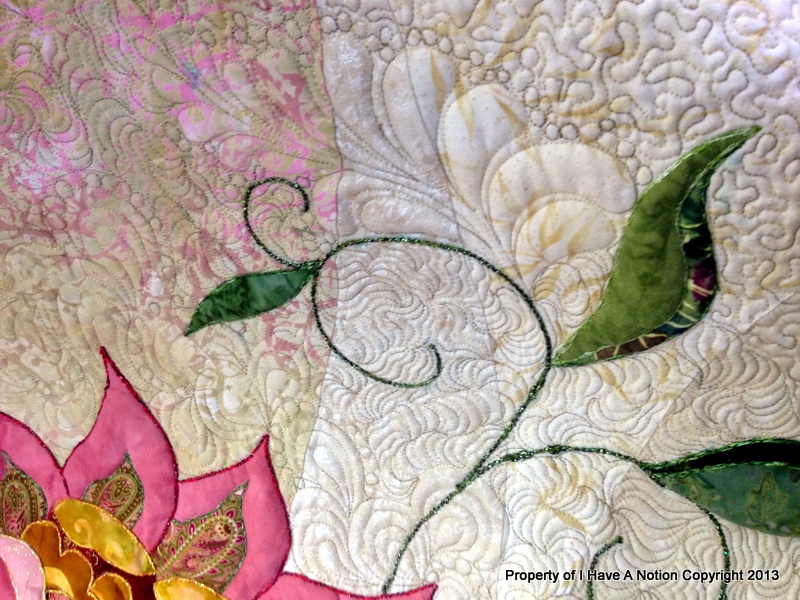
Here is a close up.  The thread work just makes this quilt outstanding in my eyes.  And check out this hidden creature:
Jean made this quilt for one of our guild challenges and won "the quilt you would most like to have hanging in your home" category.   I know I'd love to see it hanging in my home for sure!
A few more samples were shared.  I know it seems like all we did was look at Jean's work, but we only spent a few minutes drooling on her quilts.
 
I know this post is getting long, but if you are like me....ya love the photos :)

OK, now the class begins!
Well, you would have been able to see Jean stitching except for the beam of light from her Bendable Bright Light.  Don't have one?  Well, this is the proof that you get tons of light! 
This is the color way Waldo and I choose.  I'd never worked in oranges before so I thought it might be fun.  I was surprised by how many pieces of orange batiks Waldo and I have.
This is my "Expressions of the Heart" piece.  I spent so much time playing with the decorative threads that I didn't end up couching any down.  I sure did have fun playing though :)
This is my practice piece.  I found the free motion embroidery to be lots of  fun.  Couching decorative threads can be very addicting....just warning you.  I spent quite a bit of time twisting a combination of threads together to preview them on my piece.  The stitching on the far right is nothing more than a thin slice of fabric I couched down.  I can see myself now....couching down anything that doesn't move!  LOL...true!

Smiles,
Kelly

Tuesday, January 24, 2012

LUX Bar LED Task Light Follow Up & Perfect Alignment Laser (PAL) Product Review

 Before I get into my reviews, I thought I'd give you an update on the local wild life :)
 The Flamingo's were plenty warm in the recent snow and one actually was seen sledding from this miniature hill in the owners yard.  It rained yesterday...I should have run down there to see if the owners had put out enough umbrellas!!!  LOL

The LUXBAR LED Task Light I blogged about here arrived last evening.  I have had a chance to assemble the light and move it around the house a bit....I'm still very impressed with the LUXBAR Light.

Assembly is required but it was quite easy...just one screw and it was put together.
Some bloggers wanted to know how much the LUXBAR weighed so here is the skinny on it's weight:
I weighed the base and arm separately for those of you who may be interested in getting the LUXBAR Clamp Light. The arm of the LUXBAR Light weighs 11.5 oz and is approximately 19 1/4 inches long. 
The base of the light weighs 1 lb 11.2 oz and measures  apx. 5in x 7 in.
The silver knob extended out from the light is the screw that attaches the light to the base.  I left it in to show you how the light just slips onto the base.  I unscrewed the silver knob and pushed the light onto the base and re-screwed the knob and wah lah...it was put together.  The power cord, 74 inches long,  plugged into the black circle you see above the knob.   No tools required!!
The silver knob in this picture is how the LUXBAR can be adjusted by loosening and tightening that knob the light holds it's position snugly.  No bumping or moving makes the neck droop.  The LUXBAR rotates 90 degrees....basically up and down and side to side.

So I bet you are wondering how bright the lights appeared in a real house right?  This is a photo I took of the LUXBAR sitting on my kitchen table with the lights in the kitchen turned off.
I raised the head and took a photo as well....ya just never know who's going to ask for that photo so I thought I'd just beat them to the punch :) 
Then I brought the LUXBAR down to my sewing table.  Remember, I bought the one with a base and didn't get the additional clamp (yet...but I'll be getting one).  I had not really thought about using it next to my sewing machine because I have a Bendable Bright Light on my machine and it illuminates up my machine foot area wonderfully. 
A blogger friend, Perry,  wanted to see the LUXBAR demonstrated near a sewing machine so here you go :)  Above it is sitting on the base next to my current sewing machine.  My old machine has a Sew Steady Table so I also got it out and held the light arm to the acrylic table.
Above I'm holding it on the back of my Sew Steady Table and below it is in the front.
Since the arm is so light I believe it will hold onto the Sew Steady Table and not tip the table at all when I get a clamp.  You can see it does illuminate the entire sewing bed. 
 Here is  a photo of the LUXBAR sitting on top of my Sew Steady Table.  If I were just doing some piecing and wanted more light this would be just fine.  I certainly would not want it there for quilting or any large projects as it would be in the way on top of the table like this.
This light bar is what was supposed to give me some beautiful bright light....nope...after having Mr. McSteamy install this light and throwing the box away.  The only lights that can work in this light bar are not bright enough to illuminate my sewing area...and when I changed the bulbs to brighter bulbs....the light smells like something is burning.  I wish I had never bought it for this purpose in the first place.
Bottom line is I feel comfortable recommending the LUXBAR LED Task Light and I'm going to be enjoying mine.  If you are in the market for a new Task Light, I'm offering IHAN Blog Readers a special price through the end of January :) 

Many of you are into Machine Embroidery so I thought I'd add a small review of the Perfect Alighment Laser (PAL)

The PAL is a laser that assists people in centering their ME projects in the hoop.  It can also be used in beading, scrapbooking, drawing etc.


You can see the laser here...it is lined up with the centering lines on this hoop.  Now I know exactly where the center of my design needs to be.  I took the PAL with me recently and asked some experienced ME gals what they thought of the PAL.  They've been hopping for years so they didn't need any additional help in centering their designs.  I think if you are new to ME hooping and want guidance the PAL does help align your design in the center.
The PAL is also advertised as another method of sewing perfect seams.  The light can be positioned so that the laser marks the distance you want from your foot or needle and you use the laser light as a guide.

The Perfect Alighment Laser comes with 3 AAA batteries and a USB cord to plug it into your sewing machine USB

 What I think the PAL is also good when you want to embroider a name or word next to a design or on a garment pocket.  I would line up the laser and follow the horizontal line so the lettering would be straight and not slope down hill.  If you were putting a name next to a pocket for instance....you cold align the laser with a button or the edge of a pocket to be sure it comes out straight.  I hope this is all making sense....I'm certainly no expert...as you know.
This is not my embroidery piece, it was given to me by a friend.  If I wanted to go back and hoop the block and add her name I could be sure it would be placed correctly. 
I'll also embed a YouTube video here so you can see what I'm talking about.


For a video on Continuous Embroidery Alignment...you can click HERE!

I hope all of this information is helpful to some of you.  I'm off to the post office now....I'll check on the Flamingos to see how they are doing today.

Smiles,
Kelly

Monday, May 2, 2011

How ever did this happen?

Ya ever been smacked with reality....sort of hard?  Like you look in the mirror and you don't recognize the person staring back at ya?  That's how I've been feeling lately. 

While in the shower yesterday I glanced up to the Cetaphil Pump Soap that I use on my face and it read, "it softens while it cleans."  You got to be kidding me....no wonder I'm so damn soft everywhere....I need to switch to Teenager Soap!!!  I'm convinced it is time to switch to Just Naturals....look for yourself....those old ladies look young again :)

Seems like with technology these kids have everything....I mean everything.  There is some new technology called the Electronic Driving Coach that helps keep teenagers focused on their driving.  Great for them!!!  How about an Old Lady Living Coach that reminds me what I came into the room for?  Come on folks....I'm really tired of stuff for young people....I want something I can actually use....what about you?

As you can tell, I'm heading into the M word and I'm feeling older than I did just a year ago.  I went to the Eye Doctor and he told me my vision has not changed.  I wanted to scream into his young ear, "then why on earth does it seem like I can't see a darn thing anymore!!!"  Instead, I politely thanked him and left.  I'll fix this problem....who needs eye doctors anyway, right?

This is what I have been seeing when I turn on my sewing machine.

 NOW look what I see :)  I found myself a wonderful gadget that helps even the playing field a bit.  I love this CC Bigger....now all I need is a CC Smaller to place in front of the mirror!!!  Wonder if Simplicity has considered something like that? 

You can see how it attaches to my machine...and it does not get in the way of my thread or lever in the back....I put it on in less than a minute....now that certainly helps...cuz you know the M word and frustration is potential  explosion don't ya?
While watching Karen Kay Buckley's DVD I saw she had a magnifier on her Bernina.  So I priced one for myself and I learned  the CC Bigger is so much more affordable .  Now everything much easier to see (or should I say, CC?).

In the photo above you can see my Bendable Bright Light.  If you don't have one on your sewing machine and you are over 30 years old.....ya just might want to check them out.  I've never met anyone who didn't love their Bendable Bright Light

I've learned about a few other lighting gadgets and they have found their way into my daily life.

I really liked this LED lighting strip when I first saw it....it is so bright.
Check out how bright it is.  It has a peal and stick strip on the back....but I want mine to be mobile because there are so many places I use it....so instead of pealing off the backing....I use the sticky tack (used to put posters on kids walls).  The sticky tack (I got mine at Office Max) is inexpensive and it is soft and pliable so I can mount my light strip to almost anything. 

One of the ways I use the Light Strip with 6 Led Bulbs is to illuminate my DreamWorld sewing table ...then I use it as a light box.
Here you can see I have a piece of tracing paper and a Cub Scout Emblem that I needed to trace....I put the light strip under the table and it makes a really great light box.

This is what the light looks like under my DreamWorld sewing table.  No need to buy a light box....not when I can use what I already have.  See if those young people know about that!!!

Now, I know I've been going on and on about lights....but I've been fortunate to have been able to review the following two Beam and Read Lights.


I like to do needle turn applique and other hand stitching at night in the living room.  My problem is there is not enough bright directed light to be able to see those tiny stitches well.  I've been wearing my Beam and Read with 6 LED's quite a bit because it also comes with a clip on magnifier.  There will be more information about the Beam and Read Lights very soon.....I'm going to be hosting a Mother's Day Giveaway!!!  Oh yea baby :)

Hope you are having a wonderful Monday!

Smiles,
Kelly

Thursday, April 29, 2010

It's A Wrap finish and Superior Thread Company Machine Needle Experience

Well I enjoyed Tuesday morning so much I decided to take a break this afternoon and finish my, "It's A Wrap" plate (recommended first project by the author).  Keep in mind I left my book with Rosemary so I had no idea what was recommended for the process of keeping your work from getting all tangled up.  I am someone who will wrap it up around my feet....trip and fall....catch furniture with it while I walk downstairs to sew etc (yes I catch my purse strap on door knobs).  Luckily my paper towel was down to the last three pieces so I used the cardboard part to coil my wrapped line around.
Here it is next to my machine.  Check out how bright my Bendable Bright Light is....I love that thing!!!

Then all I did was use my left hand to rotate the coil under my machine while I held the cord taunt with my right hand.  It went very quickly.  I really like how forgiving this project it.  If by chance you don't catch the coil....just go back and stitch it again and it does not show.

Here she is....finished :)

And here is a close up of the fabrics.  Amy Butler fabric....oh yea!!!

These needles have nothing to do with my "It's A Wrap" project except that I used them for the first time today.  I have only used one brand of needles in my life.  I have never had a reason to change....I honestly have never thought of even trying another brand (old dog I guess).  I was asked to give these a spin and see how they worked.  I can tell you that I was able to thread the needle and that was huge for me.  I typically can't thread a needle to save my life.  Not with my glasses, two Ott lights and a Bendable Brightlight.....I guess the holes were just too small.  I had not one problem and only had to do it once....not 5-10 times licking the thread then the needle etc.  One time!!!!  The needle was nice and sharp....not one problem with the needle at all.  Guess you know where I'm going with this ay?  Yes....I'm going to start using the Superior Needles

Smiles,
Kelly

Translate

Related Posts Plugin for WordPress, Blogger...