Announcement!

I Have A Notion blog and store have moved to:


the store can be found at


There is a much easier to navigate store, with new items. The blog has its own page as well... new content too.

The blog is now at www.ihaveanotion.com/blog

Please come and visit!

Saturday, January 30, 2010

Dragon Fly Quilt and a New Work Bench

Meet Bill Kniss!!  This was his first paper pieced quilt and I think it came out great.


Posted by Picasa

I was so impressed when I saw his quilt.  He was dropping it off to be quilted at The Quilt House in Maumee when I met he and his wife Denise.  Bill said he made this as a gift for a woman in California who had given him some football tickets.  What a nice
thank you gift!!

Here at IHAN the saws and drills are running loud today.  You ask, "Kelly, is Rick building you a custom counter for your sewing?"  My reply, "Not today :(   He has learned to take good care of himself and today he is doing just that.  :)


But it looks like just a great height for me, don't you think?  I can imagine a wonderful custom built sewing area.....but I've had a great working space since we moved here 4 years ago.  Rick has not had a work bench in the house, only in the garage.  Today is the exciting day that he will have his own work space inside too.  I truthfully and very excited for him.  He was sad when we moved from our home in South Carolina.  He and his father built a wonderful work bench and we moved and had to leave it there.  But....don't even think for one minute that I am not also thinking....oh yea baby....I want a wonderful counter with real cupboards etc.  But with all the work I have been doing lately....I don't sew much.....so I guess mine can wait.  LOL

Smiles,
Kelly

Friday, January 29, 2010

GrabARoo's Stop

Do you remember Loren, my weekday mailman? Loren knocked on the door yesterday and asked if I hand any more GrabARoo's.

The best part of the story is that the previous day Loren had stopped to pick up packages and when he picks them up he knocks on my door and hand delivers my mail.  I had been laying on the sofa because I was up with a sick co-worker.   He knocks, I get up and go to the door.  Rick walks in the back door and there I stand looking like I had just woken up and Loren is there with mail at the door.  Looks suspicious!! 

The next day Loren knocks on the door needing a new pair of  GrabARoo's.  While I ran downstairs to get the gloves, Rick comes in the side door for lunch and Loren was standing at the door.  Good thing my mother was here to collaborate my story!!

Good think my husband knows I don't lie....otherwise I might be in hot water.  GrabARoo's really are the best....I've never ever heard one complaint about them.  Typically people re-order more after they see how great they are.  Then they order for their mail carriers as gifts. 

You may have noticed that I only blog about things I really believe are quality products and worth the investment.  Some might call it Marketing....I think that is for people who are trying to make sales.  I do this for my pleasure and I feel blessed to be able to love what I do.  I like to think of what I do as product testing from a users perspective.   

Smiles,
Kelly

Thursday, January 28, 2010

Kreinik Iron-On Threads and the Simplicity Bias Tape Maker

Who was the Smarty Pants who came up with this idea?


Can you guess?  Yep....it was me....Mrs. Smarty Pants...."Oh Ah Dance in Smarty Pants" (if you don't know this one....click here and scroll to the bottom of the post).

When I was in Houston for Quilt Market in October I got the business cards of Mimi Shimp, Product Manager at Simplicity Creative Group,  and of Doug Kreinik and told them they had to talk to one another.  I knew the Iron-On Threads by Kreinik would work in the Bias Tape Machine by Simplicity.    They spoke and then in November....wah lah....Kreinik puts this video on youtube.  I am thrilled to see the video.  The only thing I think they should add is at the end when it says....Go to Kreinik for Iron-On Thread and to Simplicity for the Bias Tape Maker.....it should also say....Go to www.IHaveA-Notion.com for Mrs. Smarty Pants.  ROFL

What can you think of to do with the Bias Tape Maker?  I know it also works to iron ribbon.  Just make sure your temperature control is set for the proper heat for the ribbon you are ironing.  I just run mine through without a bias tip....and wah lah....ironed ribbon :)

Smiles,
Kelly

Simplicity Bias Tape Maker UPDATE

Hear ye Hear ye


The High Standards Court will come to order (banging of gavel sound) All fine subjects heed the proclamation that there will be a temporary delay on two of the Bias Tips for the Simplicity Bias Tape Maker.

Our Fearless and Brave Bias Tip Leader, Mimi Shimp, Product Manager for Simplicity Creative Group, has delayed the production on the 1/8” and ¼” single fold bias tips until they pass her high standards …lets hear three cheers for Mimi!!!


Imagine Mimi in this lovely dress now :)

End of Proclamation :)

So if you have been waiting to get the 1/8" and 1/4" tips....you'll just have to wait until Mimi gives the go ahead.  Don't you just love it when people care enough to do the best thing for us?  I would have been disappointed had they come out and they were not what I expected.  Mimi takes good care of us!!! 

In case you don't know what I'm even talking about here it is in all it's glory....The Bias Tape Maker by Simplicity.


3/8" Single Fold Tip


1/2 " Single Fold Tip


 3/4" Single Fold Tip


1 1/4" Single Fold Tip

Quilt Binding Tip for 2 1/4" cut strip


Quilt Binding Tip for 2 1/2" cut strip


Smiles,
Kelly

Rotary Cutter Machine by Simplicity Extension Table Now Available 25.99

The Extension Tables for the Rotary Cutting Machines by Simplicity are now available!!!  I was fortunate enough to see them at Quilt Market in Houston.  I think these are really handy for the Rotary Cutting Machines because there will be a stable surface to hold your fabric while you are cutting strips.


I know many customers who asked about having a surface that would hold the fabric....well....here it is.  They are new on the market so if you want one please let me know.  Typically when things are just released they sell out and then go on back order.  It is difficult to know how many to buy in advance so let me know if you are interested.

Stay tuned....I have more interesting news from Simplicity :) 

Smiles,
Kelly

Tuesday, January 26, 2010

Electric Quilt 6 ~ 15 More Minutes of Practice

Fifteen more minutes with my EQ6 and I'm 15 minutes more creative and I still can't believe how cool this really is.  If anyone dares e-mail me to tell me I have absolutely no clue about colors....don't waste your time.  I do not now, nor will I ever claim to be talented in the area of design.  And I don't have to be either....I can try it all out before I cut it all out :)


I'm following along in the EQ6 Simplified Book that takes me step by step through every click.  Now that I am comfortable with some of the buttons and what they do,  I had to add another square, add borders and star blocks to my borders.   I learned to rotate stripped fabric and color several parts of a block at the same time with a single click.  You can refer to me as "Mrs. Smarty Pants" if you want to. 

You can see I was changing colors here and there to see what I liked the best. 


Posted by Picasa

For some reason I really like green and purple together.  I've not added any fabrics or colors to the pallet yet.  These are some of the one's that are on the side of my screen.

Next I've added the the Star Block 4 to the corner of my border.
I've also added some stripe fabric to the second border below.  I decided I really liked the red in the stripe so I changed some of my blocks to red.  You might be able to tell....I hit the wrong red at first.  So in the next pix you can see I noticed that and made them all the same tone of red.


You may not have noticed, but "Mrs. Smarty Pants" rotated the striped border fabric.  Look closely and you'll see that the stripes are no longer going up and down on the sides.  How cool is that?

So, for all of you who like green, red and purple together....this is my new creation in just 15 minutes.  I'm really proud of myself because I would have never ever ever ever attempted this without encouragement to just try it for 15 minutes. 

I'm on the last page of Lesson One.   I don't plan on making this quilt but I have to watch the software calculate fabric for me.


Please join me in this dance as I celebrate my new found "talent."

Smiles,
Kelly

Monday, January 25, 2010

One Heart, One World Giveaways

Welcome to # 636  One Heart, One World Giveaway  :  I Have A Notion :)  Feel free to look through my blog posts and find some  fun photos and stories.  I am a stitcher and quilter with an edge to my humor...please don't let that scare you away.  I also am the owner of www.IHaveA-Notion.com .  I sell sewing, needleart and quilting notions and supplies.

Some of my followers may remember I posted these last year.  I made these heart sachets as gifts at Valentines.  I think this is appropriate for the One Heart, One World Giveaway.


I gave each of these away last year so I will make 4 new ones for this giveaway.  They will be just as fun and pretty I promise.  The have lavender in them so you can use them as a sachet....or perhaps something else....read below...LOL.

Attached to each of the hearts I gave away last year was a pretty note card that read:


I am a heart sachet given to you as a symbol of gratitude for all you do for people (some said children) each and every day. I can be heated in the microwave and placed on your temples or cheeks for sinuses and headaches. If you put a cup of water in the microwave with me, you’ll have moist heat relief.


I can be placed on top of your desk, dashboard, or counter as a reminder that you are appreciated. When frustrated and tense you can lift me up- smell me- and breath in the calming effects of lavender. On really bad days, you can throw me at those who torment and anger you and innocently claim you were offering aromatherapy!!

I warned you about the edge to my humor...LOL.  I will not be including the notes this time....just the sachets.  To win these lovely sachets....just leave a comment on this post.  If you would like to be a follower so you can read more about the things I love and enjoy....feel free to click the follow button. 

The winner will be chosen by random number generator on Feb. 15, 2010.  For more information on the various giveaways that are being held as part of the One Heart, One World Giveaways click on the link here or on my sidebar.

Feel free to take a look at my free bag tag tutorial on the side of my blog as well.  They make really wonderful gifts.

Please be aware that many of you are no-reply bloggers.  I can not reply to you to let you know when you have won.  Besides its not fun being a no-reply blogger because when you leave comments for someone....they can't say thank you or contact you back.   If you don't know how to change that, click here.

Smiles,
Kelly
PS....I've been flying around on the magic carpet....and I want to say....what an incredible trip.  I am truly honored to be invited to see inside so many peoples lives, creativity and talents.  Amazing gift just to visit....thanks for the fun :)

Do you EQ?

I Do (now) and I Love It!! 

If it were not for Darlene (SewCalGal) my EQ 6 would still be in the box.  Not  because I was not excited and not because I didn't want to learn....but because I thought it would take a lot of time to learn how to use the software.  Darlene said, "Kelly....15 minutes a day."  She was right. 

I got this book, EQ6 Simplified, because it works through 6 lessons.  I sort of decided to start this way ....like I'm in EQ6 kindergarten. 


Here is Lesson One


Page One Lesson One
Each sentence told me what to do and had photos too so I would not get confused.  (This should be called the Idiots guide to EQ6....honestly)

Woo hoo, Kelly can read and click!!!
Ok, so Lesson One is the Kaleidoscope.  First I had blank template and the lesson walked me through getting the pattern in each square.  Remember, this is kindergarten for me....so I did only as they instructed.  I learned quickly that I could just take off and keep playing but I wanted to learn each tool so I did my best to stay focused.....although highly tempted to keep investigating all the variations.

Here is my first design, if you will.

I clicked on a paint brush and chose a color/fabric and then just clicked on each area that I wanted to color in.

I have learned the colors don't show up because my camera was too close to the screen.  These should all be the same depth of color.  I found it interesting to change just a few things to see how different the blocks looked.  I could accentuate what ever design I wanted.  I think the person who wrote this Lesson knew how to engage a beginner.  I really picked up the idea quickly by following along in the book and then I just started working/playing.  I'm warning you...don't drink coffee while starting this Lesson.  My heart was pumping and I got excited and if I had had some coffee....I would have been up all night long....no kidding.


A few more changes....and it looks different.

I changed the color pallet and decided to highlight some other patterns in the same template.  Look how cool this one looks.

This is the same pattern but look how different it looks.  You may not like the colors but I'm just learning to use the tools so I just picked anything that would not ruin my eye sight...LOL


Here is is again....different colors.

I decided to play with red and white so I just whited out some of the design and started playing with red and white.  I then thought of trying black in there too.....but my 15 minutes was up. 


I'm hooked.  I know I will continue with my lessons because I want to be able to build on my skills.  Isn't it interesting how different my "quilts" look compared to the photo in Lesson One above....all just a click of a button to preview another option.

I have a very difficult time deciding on fabrics for quilt projects.  I have auditioned and auditioned fabrics and then decided upon a combination.  Once it is cut out....I did not like the way the colors or shapes looked together. (Remember my Sizzling Circles?  I cut out 4 different leaves....all batiks....did not like a single one even though the fabric next to the background looked good at the beginning.)  Not any more....this is like a crystal ball....I can see it first then ....change it around if I want to....try different combinations....never having cut one piece of my lovely fabric. 

Thank You Darlene for the encouragement and Thank You Electric Quilt Company (Sarah :)  for the wonderful software....I Love It!!!

Big Smiles,
Kelly


Sunday, January 24, 2010

AccuQuilt Go Demonstrated

I've had a few people e-mail me and ask how the AccuQuilt Go works.  Below is a demo. 


Smiles,
Kelly

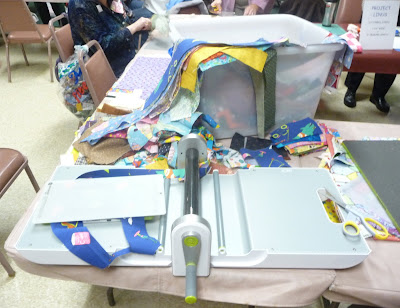
AccuQuilt Go went to Charity Night at GOQ for Project Linus

We had a great turn out for charity work night at The Gathering of Quilters Guild last Thursday night.  I don't know how many people were there but every table was full and people were working the entire time.  There were separate tables set up for a variety of charities including: Mended Hearts, Project Linus, Quilts of Valor and Hospice Comfort Pillows.


I took the AccuQuilt Go to cut fabrics from a variety of pieces Project Linus had in a bin.  My girlfriend Dana and I had some good laughs while we were cutting 2 1/2 in strips and 3 1/2 x 6 1/2 inch rectangles for Project Linus Quilts.  For more information about the Toledo/Lucas County Chapter of Project Linus Quilts please e-mail Nancy at bussing@bex.net.

We had fun fussy cutting some of the fabrics with sharks and other pictures.  I think that the rectangles will make a very fun scrap quilt with lots of really neat fabrics that we cut for them on Thursday night.

I was surprised by the number of people who had not seen the AccuQuilt Go before.  I demonstrated how it works and let them have some fun with it too.  If you are local (Toledo OH vic) and would like to use the AccuQuilt Go, feel free to e-mail me at IHaveANotion@yahoo.com and I'll let you give it a whirl....it is lots of fun.

Then of course was show and tell.  The first quilt here was done by Dale Burnett.  Had I known in advance she was working on this quilt I guarantee I would have found my way into her home and stolen this quilt...or at least had the urge to do so!!  Isn't is just soooo cool?  This quilt, "Zebras",  was designed by Lisa Moore and published in the Sept/Oct 2009 Fons and Porter Love of Quilting magazine.


Posted by Picasa

The hand embroidery on this next quilt, "South of the Border", was done by Thorneta Hinkle.  She is 88 and has been doing hand embroidery for over 80 years.  She donated the embroidered blocks and some ladies put them together to make a beautiful quilt for charity.  I know if I were in need and received something this beautiful it would renew my spirit.


I happen to know some of the ladies how did some of the Hungarian Embroidery on this next quilt.  During some of our gatherings I watched as they stitched these beautiful blocks for a raffle quilt.  It is absolutely stunning, the photo does it no justice.  It was raffled by the Calvin United Church of Christ in Toledo Ohio.  Joyce Smith was the lucky winner of the quilt and she brought it to show and tell.  I'm going to start buying more raffle tickets....can you imagine winning such a treasured quilt?

This next quilt cracks me upSheila Painter can take the credit for this fun quilt.  I know many people spend hundreds of hours putting together their Dear Jane Quilts.  Sheila did what I would do....she bought a convenience panel while on vacation and machine quilted it.


I can hear the booooos and hissssses through my computer girls.  I know, I know.....but think about the people who have no clue as to the hundreds of hours putting together a "real" Dear Jane Quilt.  This type of thing is for them.  They will see it and say....oh that's nice.
This last quilt here really grabbed me.  Candy Colleen Rudd made this quilt.  This is Candy's first quilt that was created with all hand work.  She did needle turn applique, embroidery, hand piecing  and then she hand quilted this wall hanging.


Posted by Picasa


I only wish my photography was better.  These photos do no justice to the real magic in this quilt.  I love to do hand work and this piece is very inspiring.

Smiles,
Kelly

Translate

Related Posts Plugin for WordPress, Blogger...